#Introduction
In this tutorial, we will set up a production‑ready stateful HTTP API written in Go (using only the standard library) and connect it to a modern Next.js dashboard. The API implements advanced features like refresh token rotation (stored in Redis), distributed rate limiting, and a clean layered architecture (controller → service → repository → model → mapper → dto).
We will:
- Pull the Docker image
v4.0.0of the Go-Stateful-HTTP-API-Blueprint - Run the full stack (API + PostgreSQL + Redis) using the provided
Makefilecommands - Test the API endpoints with
curl - Integrate the go-nextjs-api-frontend to obtain a complete full‑stack application
By the end, you will have a locally running system that demonstrates secure authentication, session management, and a dashboard UI.
#Key Features
Contract‑first
Define your API in openapi.yaml, then generate type‑safe server stubs.
The OpenAPI specification acts as the single source of truth for the entire API. Using oapi-codegen, the project automatically generates Go structs for all request/response DTOs, as well as a type‑safe server interface. This ensures that the implementation never drifts from the documentation, and any change to the contract triggers a regeneration step (via make generate). It eliminates hand‑written serialisation boilerplate and guarantees consistency across handlers, mappers, and tests.
No external web framework
Only the standard library (net/http) and a code generator.
Instead of relying on popular frameworks like Gin, Echo, or Fiber, this blueprint uses Go’s built‑in net/http package combined with generated server stubs. This keeps the dependency graph minimal, improves build times, and avoids framework‑specific lock‑in. The generated code implements the standard http.Handler interface, making it easy to integrate with any middleware or existing Go tooling. The result is a lightweight, highly performant server with no third‑party routing or reflection overhead.
Feature‑based layered architecture
Each feature is isolated (controller, service, repository, model, mapper, dto, tests), making it easy to scale or split into microservices later.
Every vertical slice (e.g., auth, user, admin, health) follows the same internal structure: controller/ handles HTTP concerns, service/ contains business logic, repository/ abstracts data persistence, model/ defines database entities, mapper/ converts between layers, dto/ holds API transfer objects, and tests/ includes both unit and integration tests. This strict separation of concerns makes each feature self‑contained, testable in isolation, and ready to be extracted into a standalone microservice with minimal refactoring.
Enterprise‑ready health endpoint
Real checks for PostgreSQL and Redis, returns 200/503 with detailed checks map.
The /api/v1/health endpoint does not simply return a static “OK”. It actively pings PostgreSQL (with a 2‑second timeout) and Redis, verifying that both dependencies are reachable and responsive. The response includes a checks map that shows the status of each dependency ("database": "ok" or "database": "fail"). If all dependencies are healthy, the endpoint returns 200 OK; otherwise, it returns 503 Service Unavailable. This is essential for load balancers, orchestration platforms (Kubernetes liveness/readiness probes), and monitoring systems.
Dual‑mode authentication
Supports both httpOnly cookies (secure web BFF) and Authorization: Bearer headers (mobile apps) from the same endpoints.
The authentication middleware reads the access token either from the access_token httpOnly cookie (for web browsers) or from the Authorization: Bearer header (for mobile or CLI clients). This means the same POST /login and POST /verify-otp endpoints can serve both a web dashboard and a mobile app simultaneously. The backend sets cookies when the client is a browser (e.g., via Set-Cookie) and also returns the tokens in the JSON body, giving flexibility to the consumer.
Refresh token rotation
One‑time use refresh tokens stored in Redis, automatically rotated on each refresh request.
When a client uses a refresh token (via POST /api/v1/auth/refresh), the backend invalidates that specific token in Redis and issues a completely new access‑refresh token pair. This rotation makes stolen refresh tokens useless after a single use. Old tokens cannot be reused, mitigating replay attacks. Refresh tokens are stored in Redis with a time‑to‑live (TTL) that matches their expiration, and each token is bound to the user ID and device fingerprint (if implemented).
Session endpoint
GET /api/v1/auth/session returns current user without needing a separate profile request.
Instead of forcing clients to call /users/me after authentication, this dedicated session endpoint returns the full authenticated user object in one round trip. It uses the same JWT (from cookie or header) and extracts the user from the database on the fly. This simplifies the frontend logic and reduces the number of requests needed to initialise a user’s session.
JWT authentication with OTP verification
Register, login, email‑based OTP activation, and password reset flows.
The authentication system follows a secure, modern flow:
- Registration (
POST /api/v1/auth/register) creates a user inpendingstate and sends a 6‑digit OTP to the user’s email (stored in Redis with a 10‑minute TTL). - OTP verification (
POST /api/v1/auth/verify-otp) activates the account and returns access/refresh tokens. - Login (
POST /api/v1/auth/login) verifies credentials and returns tokens for active users. - Password reset – two endpoints:
request(sends a reset token via email) andconfirm(updates password using the token). All token generation and validation happens server‑side with Redis TTL.
User profile & preferences
GET /users/me and PATCH /users/me/preferences.
Authenticated users can retrieve their full profile (including email, username, avatar, and metadata) via GET /api/v1/users/me. Additionally, user‑specific preferences (e.g., theme, notifications, locale) are stored in a separate user_preferences table and can be updated partially using PATCH /api/v1/users/me/preferences. This separation keeps the main user table clean while allowing flexible feature flags.
Admin user management
Full CRUD on users (/admin/users) with role‑based access (admin only).
Administrators have dedicated endpoints to manage users:
GET /api/v1/admin/users– list all users (with pagination support)POST /api/v1/admin/users– create a user (with any role)GET /api/v1/admin/users/{id}– get a single user by IDPUT /api/v1/admin/users/{id}– update a user’s details and roleDELETE /api/v1/admin/users/{id}– soft‑delete or hard‑delete a user
Access is guarded by the JWT role claim; only users with theadminrole can call these endpoints.
Distributed rate limiting
Redis‑based token bucket, per client IP, returns 429 with Retry-After headers.
The rate limiting middleware uses Redis to store token bucket state for each client IP address. This works seamlessly across multiple instances of the API (horizontal scaling). The rate is configurable via the RATE_LIMIT_PER_SEC environment variable. When a client exceeds the limit, the API responds with 429 Too Many Requests and includes a Retry-After header indicating how many seconds to wait. This protects the API from abuse and brute‑force attacks.
Request correlation
X-Request-Id header automatically generated, stored in context, and logged.
Each incoming request receives a unique X-Request-Id header (generated as a UUID if not provided by the client). This ID is propagated through the context and included in every log line emitted during the request’s lifecycle. It allows developers to trace a single request across middleware, controllers, services, repositories, and external calls – essential for debugging distributed systems.
CORS & security headers
Configurable CORS, plus X-Content-Type-Options, X-Frame-Options, HSTS, CSP, etc.
A dedicated middleware adds defense‑in‑depth HTTP security headers:
X-Content-Type-Options: nosniffprevents MIME type sniffing.X-Frame-Options: DENYmitigates clickjacking.Strict-Transport-Securityenforces HTTPS (configurable max‑age).Content-Security-Policyrestricts resource loading.Referrer-Policycontrols referrer information.
CORS is fully configurable via environment variables (CORS_ALLOWED_ORIGINS,CORS_ALLOWED_METHODS, etc.), making it easy to integrate with frontends running on different origins.
RFC 7807 error handling
Standardised application/problem+json error responses.
All API error responses conform to RFC 7807 (“Problem Details for HTTP APIs”). Each error includes:
type– a URI that points to human‑readable documentation (e.g.,/errors/validation.html)title– a short summary of the problem typestatus– the HTTP status codedetail– a human‑readable explanation specific to this occurrenceinstance– (optional) a URI reference that identifies the specific occurrence.
This standardisation allows clients to handle errors programmatically while providing developers with clear documentation links.
Global request validation
Automatic DTO validation with field‑specific RFC 7807 errors.
A global validation middleware intercepts requests and validates the body against the DTO’s validation rules (e.g., required fields, email format, password strength). If validation fails, the middleware returns a 422 Unprocessable Entity response with a RFC 7807 error that lists each problematic field, the rejected value, and a reason. The original request body is restored after validation so that the controller can still read it. This centralises validation logic and keeps handlers clean.
Structured JSON logging
log/slog with request ID, method, path, status, latency.
All logs are output as structured JSON, making them easy to ingest into log aggregation systems (ELK, Loki, Datadog). The logging middleware records every HTTP request with fields like request_id, method, path, status, latency_ms, remote_ip, and user_agent. Application logs from services and repositories also include the same request_id for correlation. The log level can be adjusted via environment variables (LOG_LEVEL).
Docker Compose
Full stack (PostgreSQL, Redis, Go app) with hot reload (air).
The provided docker-compose.yml defines three services: PostgreSQL (data persistence), Redis (caching/token storage), and the Go application itself. For development, the Go service uses air – a live‑reload tool that watches source files and automatically rebuilds/restarts the server on changes. This gives instant feedback without manual restarts. One command (make docker-up) starts the entire stack, making it trivial for new contributors to spin up a production‑like environment.
GitHub Actions CI/CD
Tests with service containers, builds and pushes Docker image on tags.
The CI workflow runs unit and integration tests using PostgreSQL and Redis as service containers, ensuring the database integration works correctly. The CD workflow triggers on tag pushes (e.g., v4.0.0): it builds the Docker image, tags it with the version and latest, and pushes it to Docker Hub. This fully automated pipeline guarantees that every tagged release is production‑ready and publicly available.
OpenAPI UI
Swagger documentation embedded in the binary.
The Swagger UI static files are embedded into the Go binary using embed, and the openapi.yaml specification is served at /openapi.yaml. The UI is available at /docs/ and provides an interactive interface to explore all endpoints, send test requests, and view request/response schemas. This documentation is always in sync with the code because it is generated from the same OpenAPI file.
Makefile
Automates generation, scaffolding, running, testing, Docker management.
A comprehensive Makefile abstracts away complex commands:
make generate– regeneratesapi.gen.gofromopenapi.yamlmake scaffold-feature name=X– creates the full folder structure for a new featuremake test– runs all tests (unit + integration)make docker-up/docker-down– manages the Docker Compose stackmake dev– runs the server with live reloadmake docker-rebuild– performs a full clean rebuild.
This reduces tribal knowledge and allows both new and experienced developers to run common tasks with simple commands.
Microservice‑ready
Designed to be deployed as a monolith today and split into microservices tomorrow with minimal refactoring.
Because each feature is fully isolated (independent controller, service, repository, and database schema), extracting a feature into its own microservice requires copying the feature folder and the shared packages (auth, config, logger), adding a standalone main.go, and routing traffic via an API gateway. The repository layer can be changed from direct PostgreSQL calls to gRPC or HTTP clients without affecting the service layer. This architecture provides the best of both worlds: the operational simplicity of a monolith during early stages, with a clear path to microservices when scale demands it.
#Prerequisites
Make sure you have the following installed:
- Docker and Docker Compose (latest versions)
- curl (for testing API endpoints)
- Node.js 18+ and pnpm (for the frontend)
- Make (usually pre‑installed on Linux/macOS, or via
choco install makeon Windows)
#Step 1: Pull the Docker Image
The API is published on Docker Hub as adnenrebai/rest-api-blueprint. We will use the tag v4.0.0 as requested.
docker pull adnenrebai/rest-api-blueprint:v4.0.0Note: If
v4.0.0is not yet available, you can usemainor the latest stable tag (e.g.,v3.2.0). The commands remain the same.
To verify the image has been pulled:
docker images | grep rest-api-blueprint#Step 2: Run the Full Stack with Make Commands
The repository includes a comprehensive Makefile that simplifies running the stack. All the commands listed below are documented in the README.md.
Clone the repository (if you haven’t already):
git clone https://github.com/adnenre/Go-Stateful-HTTP-API-Blueprint.git
cd Go-Stateful-HTTP-API-Blueprint
Now start all services (PostgreSQL, Redis, and the Go API) in detached mode:
make docker-upThis command will automatically pull any missing images and start the containers. The API will be available at http://localhost:8080.
To see the live logs from all services:
make docker-logsIf you prefer to run the stack with logs attached (press Ctrl+C to stop):
make docker-dev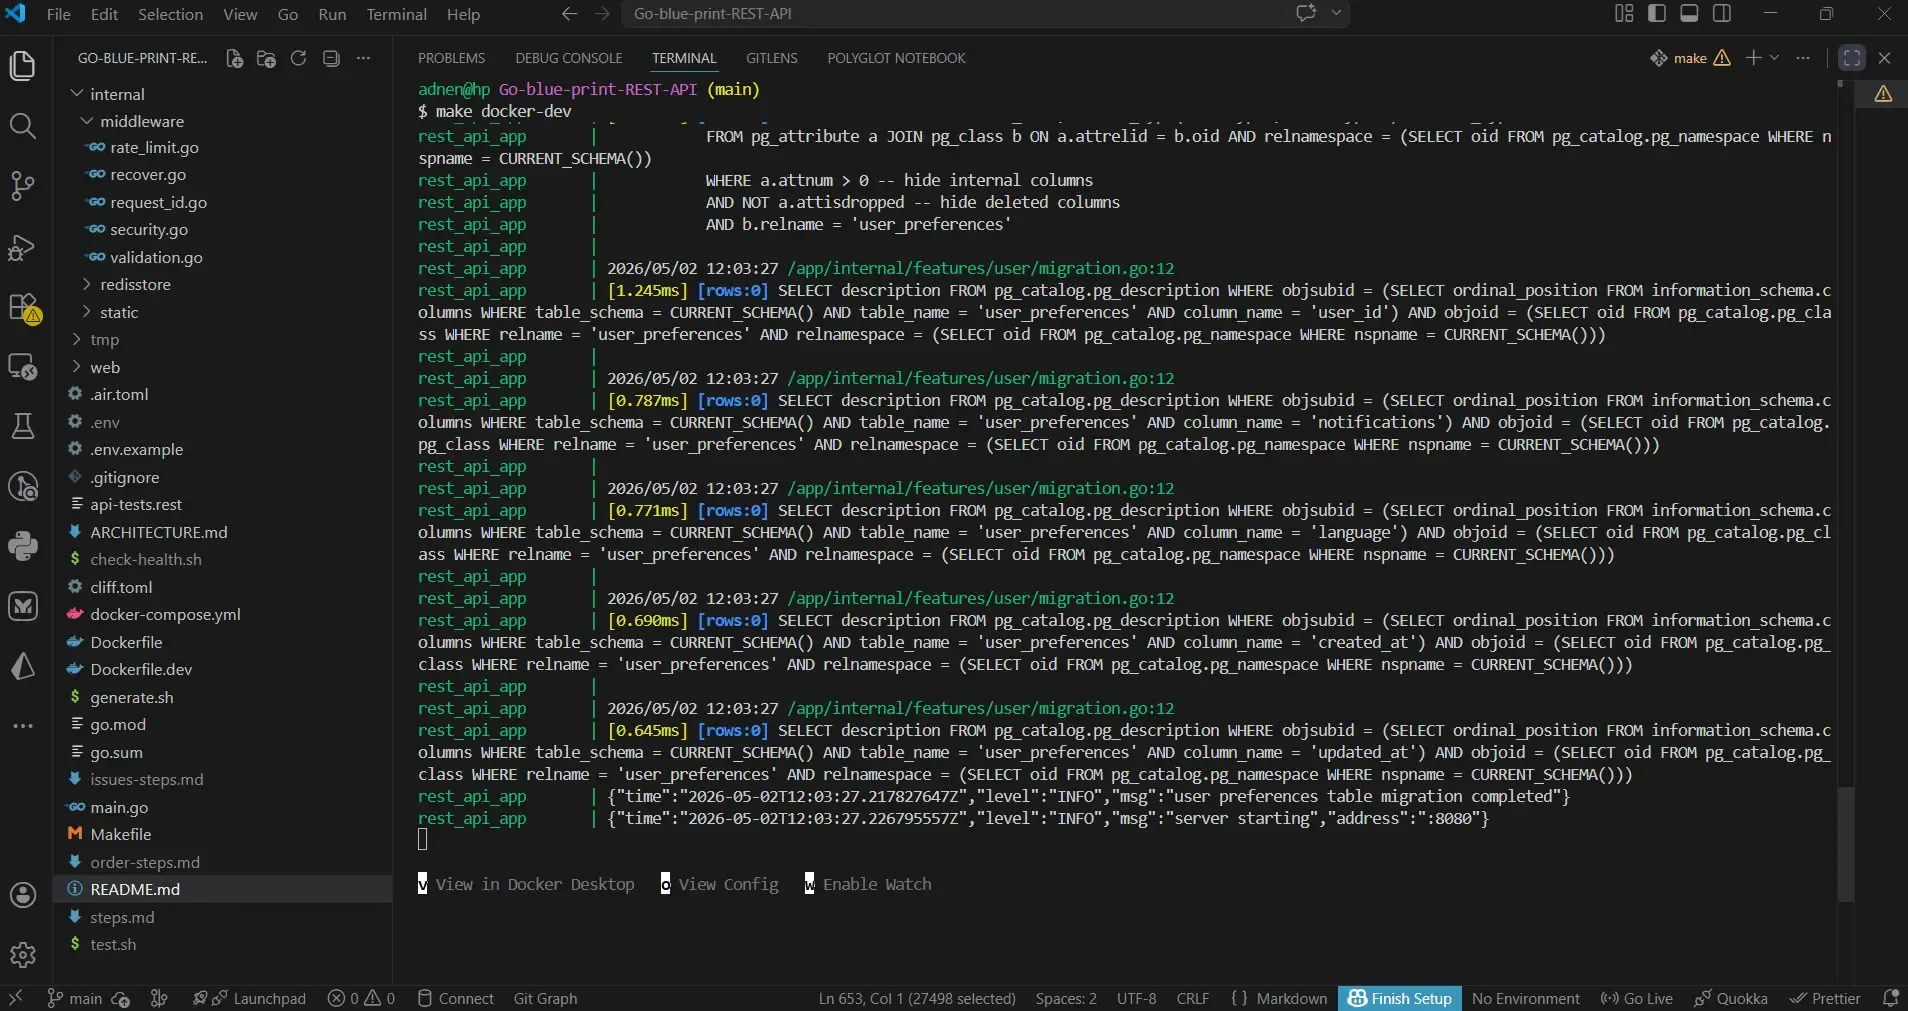
When you want to stop everything:
make docker-down#Additional Useful Make Commands
The README.md also lists these handy commands:
| Command | Description |
|---|---|
make install-tools | Installs oapi-codegen (required for generation) |
make install-air | Installs air (live reload) |
make generate | Regenerates internal/gen/api.gen.go from openapi.yaml |
make scaffold-feature name=X | Creates full layered structure for a new feature X |
make run | Runs the server locally (no live reload) |
make dev | Runs with live reload (air) |
make test | Runs all unit and integration tests (requires PostgreSQL/Redis) |
make clean | Removes generated files |
make docker-build | Rebuilds the app image |
make docker-clean | Removes containers, volumes, images, and build cache |
make docker-rebuild | Full clean rebuild (runs docker-clean then docker-dev) |
#Step 3: Check Routes Using curl
Now that the API is running, let’s test the most important endpoints. Note: all API paths are prefixed with /api/v1.
#Health Check
First, verify that the API and its dependencies are healthy:
curl http://localhost:8080/api/v1/healthA successful response looks like:
{
  "status": "success",
  "data": {
    "status": "healthy",
    "timestamp": "2026-05-02T10:00:00Z",
    "uptime": "1m2s",
    "version": "1.0.0",
    "checks": {
      "database": "ok",
      "redis": "ok"
    }
  }
}#User Registration
Create a new user account (the response is 202 Accepted – the account is created in a pending state until OTP verification):
curl -X POST http://localhost:8080/api/v1/auth/register \
  -H "Content-Type: application/json" \
  -d '{
    "email": "demo@example.com",
    "password": "Demo123!",
    "username": "demouser"
  }'
The API will send a 6‑digit OTP code to the user’s email. In development, the OTP is printed in the API logs. Check it with:
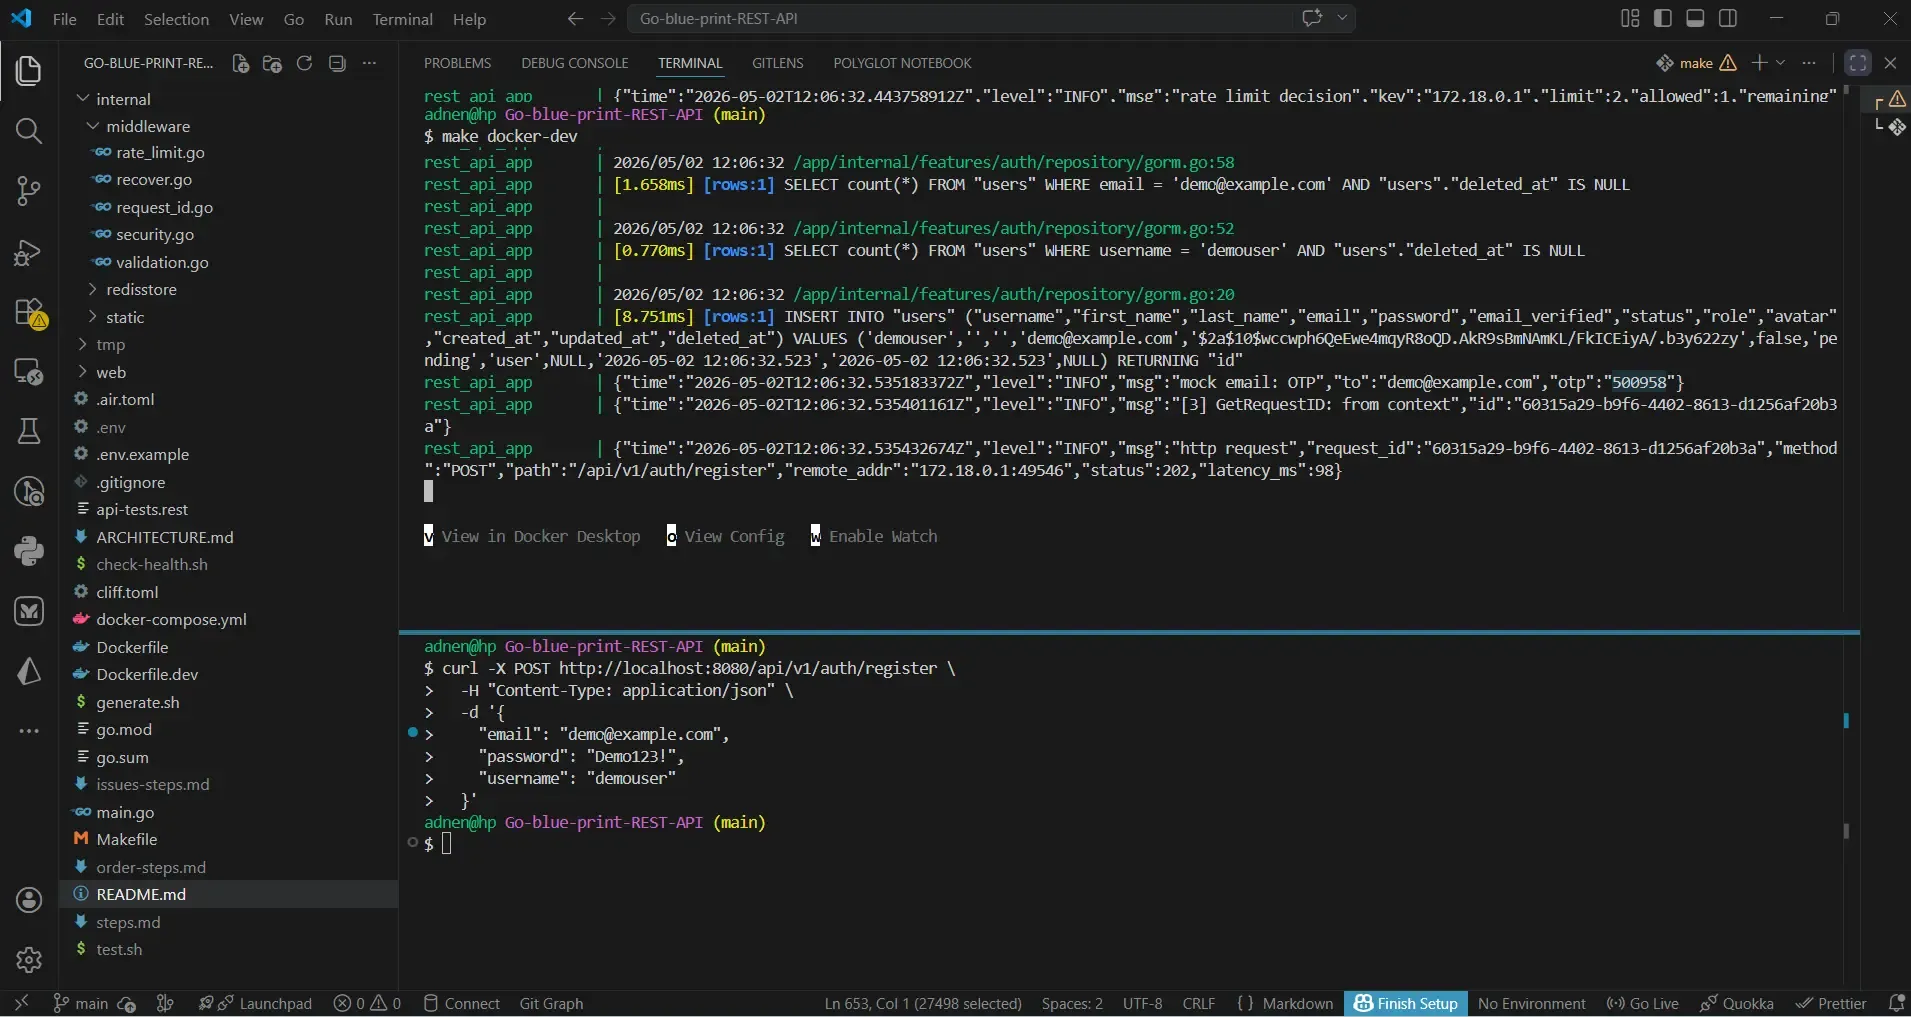
make docker-logs | grep OTPUse that OTP to activate the account (this endpoint returns access and refresh tokens): see the screenshot example.
curl -X POST http://localhost:8080/api/v1/auth/verify-otp \
  -H "Content-Type: application/json" \
  -d '{
    "email": "demo@example.com",
    "otp": "500958"
}'#User Login
If the account is already activated, you can log in directly:
curl -X POST http://localhost:8080/api/v1/auth/login \
  -H "Content-Type: application/json" \
  -d '{
    "email": "demo@example.com",
    "password": "Demo123!"
  }'
The response will contain both access_token and refresh_token (JSON body). Additionally, the API sets httpOnly cookies for web clients.
#Get Current Session (Protected Endpoint)
Use the access token to get the current user’s profile (this endpoint returns more fields than a typical /users/me):
curl -X GET http://localhost:8080/api/v1/auth/session \
  -H "Authorization: Bearer YOUR_ACCESS_TOKEN"
Alternatively, if you used the cookie‑based login, just call the endpoint without the header – the cookie will be sent automatically.
#Access User Profile
curl -X GET http://localhost:8080/api/v1/users/me \
-H "Authorization: Bearer YOUR_ACCESS_TOKEN"#Refresh Token Rotation
The API implements refresh token rotation – each refresh request invalidates the old token and issues a new pair.
For mobile apps (send refresh token in JSON body):
curl -X POST http://localhost:8080/api/v1/auth/refresh \
  -H "Content-Type: application/json" \
  -d '{"refresh_token": "YOUR_REFRESH_TOKEN"}'
For web clients (cookie automatically sent, no body needed):
curl -X POST -b cookies.txt -c cookies.txt http://localhost:8080/api/v1/auth/refresh#Rate Limiting
The rate limiter is IP‑based (distributed using Redis). Make many requests quickly to trigger a 429 response:
for i in {1..20}; do curl -I http://localhost:8080/api/v1/health; doneAfter exceeding the limit, you will see HTTP/1.1 429 Too Many Requests with a Retry-After header.
#Step 4: Connect the Next.js Frontend
Now we will set up the frontend that consumes this API. The frontend follows the Backend‑for‑Frontend (BFF) pattern: authentication requests go to Next.js API routes, which act as a secure proxy to the Go backend. Tokens are stored in httpOnly cookies.
#Clone and Install
git clone https://github.com/adnenre/go-nextjs-api-frontend.git
cd go-nextjs-api-frontend
pnpm install#Environment Setup
Create a .env.local file:
cp .env.example .env.localEdit .env.local and set the API URL:
API_URL=http://localhost:8080/api/v1
NEXT_PUBLIC_API_URL=""
NODE_ENV=development#Run the Frontend
pnpm devOpen your browser at http://localhost:3000. You will see a dashboard with:
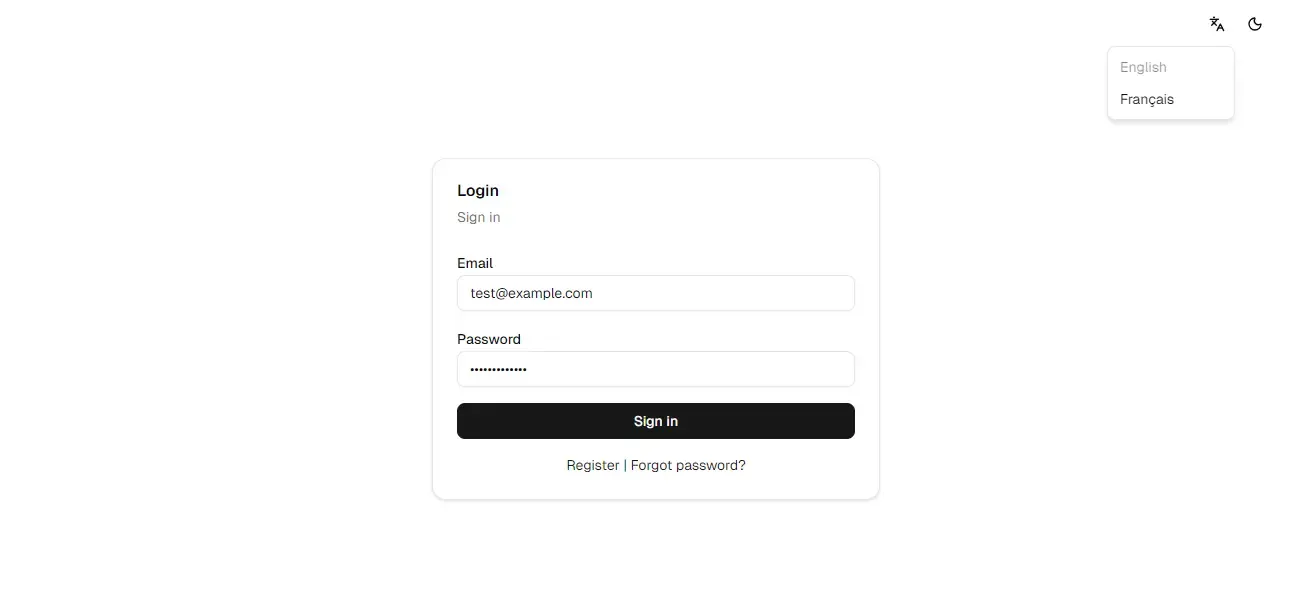
- Registration / Login pages
- User profile
- Admin user management (if you promote a user to admin in the database)
#How the Frontend Connects to the Backend
- The Next.js app runs on
localhost:3000and the Go API onlocalhost:8080 - All
fetchcalls to/api/*inside the frontend are proxied to the Go backend (seenext.config.ts) - Tokens are stored as
httpOnlycookies – never exposed to client‑side JavaScript - The authentication context (
lib/auth-context.tsx) uses the BFF routes to log in, log out, and refresh sessions
#Verify the Full Integration
- Register a new user via the frontend UI
- Check the API logs (or email mock) for the OTP, then verify it through the frontend’s OTP page
- Log in – you will be redirected to the dashboard
- Open your browser’s developer tools → Application → Cookies. You will see
access_tokenandrefresh_tokencookies (HttpOnly flag set). - The dashboard fetches the user profile by calling the protected endpoint through the BFF.
#Troubleshooting
| Issue | Solution |
|---|---|
| Port 8080 already in use | Stop the conflicting process or change the host port in docker-compose.yml |
| CORS errors in the frontend | The backend allows CORS from http://localhost:3000 by default. Check your API config. |
| Session does not persist | Ensure that credentials: 'include' is used in fetch calls (the frontend already does this). |
| OTP not received | The OTP is printed in the API logs. Run make docker-logs | grep OTP. |
make command not found | Install make (e.g., sudo apt install make on Ubuntu, brew install make on macOS, or choco install make on Windows). |
| Health endpoint returns 503 | Check that PostgreSQL and Redis containers are running (docker ps). Restart with make docker-down && make docker-up. |
| 429 Too Many Requests | You exceeded the rate limit. Wait a few seconds and retry. The Retry-After header indicates the wait time. |
| Invalid token error (401) | Your token may have expired. Use the refresh endpoint to obtain a new pair, or log in again. |
| Email not sending (mock mode) | In development, emails are logged to the console. Check the API logs with make docker-logs. For production, configure SMTP. |
#Next Steps
- Explore the interactive API documentation at
http://localhost:8080/docs/(Swagger UI) - Promote a user to admin via database (
docker exec -it ... psql ... UPDATE users SET role='admin'...) and test admin endpoints (GET /api/v1/admin/users) - Use
make scaffold-feature name=YourFeatureto add new functionality - Deploy the backend using the provided Docker image and the frontend to Vercel
- Read the Go Fundamentals guide for a deep dive into Go
#References
- Go Stateful HTTP API Blueprint GitHub
- go-nextjs-api-frontend GitHub
- Docker Hub – adnenrebai/rest-api-blueprint
Happy coding! 🎉